
PUREJOIN POS: Complete Setup & Operations Guide
Preparation Checklist:
-
Power up all devices.
-
Connect your iPad and Customer Display to Wi-Fi.
(Note: If you received your iPad and devices directly from PUREJOIN, they are pre-configured. You can skip directly to Section 4: System Operations.)
Part 1: Initial Setup
1. App Installation & iPad Settings
-
Open the App Store and search for PUREJOIN.
-
Download the app. (Note: You must have an Apple ID. If you need one, go to Settings > Apple ID > Media & Purchases to create one.)
-
Configure your iPad keyboard to prevent POS typing errors:
-
Go to Settings > General > Keyboard.
-
Uncheck the following: Auto-Correction, Shortcuts, and Predictive.
-
-
(For iPad Pro 12.9” users only): Go to Settings > Display & Brightness and select Zoomed.
2. Bluetooth Device Setup
Scanner:
-
Scan the barcodes on the scanner programming guide (5 barcodes on the first page, 4 on the last page).
-
Go to Settings > Bluetooth on your iPad.
-
Tap LI4278 (for Zebra scanners) or SL_******* (for Teemi scanners) under "Other Devices".
-
Once connected, the scanner will appear under "My Devices".
Printer:
-
Go to Settings > Bluetooth on your iPad and ensure your printer (e.g., TM-******) is connected.
3. Store Configuration in PUREJOIN
-
Open the PUREJOIN POS For Beauty app and log in with your ID & Password.
-
Tap Menu (top left) and select Settings.
-
Enter or modify your store information, then tap Save (top right).
-
Tap i on Printer 1.
-
Select your Epson printer from the right-hand menu, return to Store Settings, and tap Save.
-
Close the PUREJOIN POS app completely, then reopen it.

Congratulations! Your system is now ready to process transactions.
Part 2: System Operations
4. Shortcuts & Functions
Shortcuts allow for quick access to items and system functions.
-
To add an item shortcut: Tap Add shortcut in any item group, then select or search for the item.
-
To add a function shortcut: Select Add Shortcut and choose from the available functions below:
-
AMOUNT DISCOUNT: Apply a specific dollar ($) discount.
-
PERCENTAGE DISCOUNT: Apply a percentage (%) discount.
-
OPEN: Open a batch (Mandatory before making transactions).
-
CLOSE: Close the batch for cash management and print the Batch Report.
-
NO SALE: Open the cash drawer without a transaction.
-
RETURN: Process a return with a receipt.
-
SEARCH ITEM: Look up specific inventory.
-
REPRINT LAST TRANSACTION: Reprint the previous receipt.
-
TIME CLOCK: Easy clock-in/out for cashiers.
-
VIEW ACCOUNT / VIEW HOLD / VIEW QUOTE: Manage orders, held transactions, and quotes.
-
VIEW JOURNAL: View all system activities.
-
HOW TO: Opens PUREJOIN tutorial videos on YouTube.
-
LOGOUT: Sign out of the current account.
-

5. Opening and Closing Batches
Opening a Batch (Required before selling):
-
Tap Open (from Functions or Shortcuts).
-
Tap the Cash amount bar.
-
Count the starting cash and enter it into the Denomination Window.
-
Close the Denomination Window and tap Save.
Closing a Batch (For end-of-day cash management):
-
Tap Close Batch (from Functions or Shortcuts).
-
Tap the Cash amount bar.
-
Count the drawer's cash and enter it into the Denomination Window.
-
Close the window, tap Save, and check the printed Batch Report.
Part 3: Processing Transactions
6. Selling Items & Basket Features
-
Scan an item or use Open Item in the Top Menu to ring it up.
-
Use the basket features to modify the line item if needed:
-
[ + ]: Add quantity.
-
[ - ]: Deduct quantity.
-
[ Qty ]: Change quantity using the number pad.
-
[ % ]: Apply a percentage discount to the item.
-
[ $ ]: Apply a dollar discount to the item.
-
[ Remove ]: Delete the item from the basket.
-
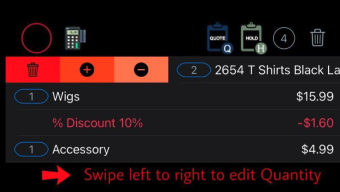

Reprint receipt:
- Select Reprint Last Transaction.
- Find the transaction and swipe from right to left.
- Select Reprint.

-
Tap Pay in the checkout area.
-
Select Cash or Credit.
-
Enter the amount on the Money Keypad or use a Quick Checkout button to finalise the sale.

7. Holding & Recalling Transactions
-
To Hold: Tap Hold on the upper right of the checkout screen.
-
To Recall: Tap View Hold from the shortcut menu, locate the transaction, swipe from right to left, and tap Recall.

Part 4: Customer Display & Rewards
8. Customer Display Setup
-
Open the Interactive Customer Display Manager app on your customer-facing device.
-
Look up the POS IP Address by tapping the Credit Card symbol on the upper menu of your main POS iPad.
-
On the Customer Display, go to Settings, enter the POS IP Address, and tap Save.

9. Rewards System & Customer Check-In

-
Before pressing "Charge" during a transaction, ask the customer to check in on the Customer Display by entering their phone number.

-
If they are an existing member, the display will show their reward balance, and a red human-shaped icon will appear in the top right corner of your POS screen.

-
The customer can tap their screen to choose how much reward money they want to apply to the transaction. (Note: You can also adjust this from the POS, but changes made on the POS won't visually reflect on the customer's screen.)


-
Clear Customer: If you need to remove a customer from the current transaction, use the Clear Customer function.

Part 5: Returns, Refunds, and Exchanges
10. Returns to Store Credit (With Receipt)
-
Tap the Return button in Functions/Shortcuts.

-
Scan the barcode on the customer's receipt and press OK.

-
Ensure the customer is checked in, choose the transaction, and tap RETURN.

-
Enter the exact amount to return, and complete the transaction.

11. Returns to Store Credit (Without Receipt)
-
Select the item being returned on the POS.
-
Adjust the item to a negative quantity (or manually enter a negative amount).

-
Tap Charge (the total should reflect a negative amount).

-
Select Store Credit, tap the exact amount button, and complete the transaction.

12. Refunds to Original Credit Card
(Note: The original credit card must be present.)
-
Go to Functions and tap Return.
-
Scan the barcode on the receipt.

-
Tap Refund on the bottom right.
-
Insert or swipe the customer's credit card to process the refund.

13. Exchanges
-
Ring up the item the customer is returning and adjust the Qty to - (minus).

-
Ring up the new item the customer is exchanging it for.

-
The system will calculate the difference. Proceed to checkout to finish the exchange.